
The Facebook API lets you post to pages you administrate. In the article below I’m going to explain how I did this, using version 5 of the SDK for PHP.
The brief was to write a script which automatically posted any newly added WordPress custom posts to my clients company Facebook page. So here’s how it went:
1. Create a Facebook ‘App’:
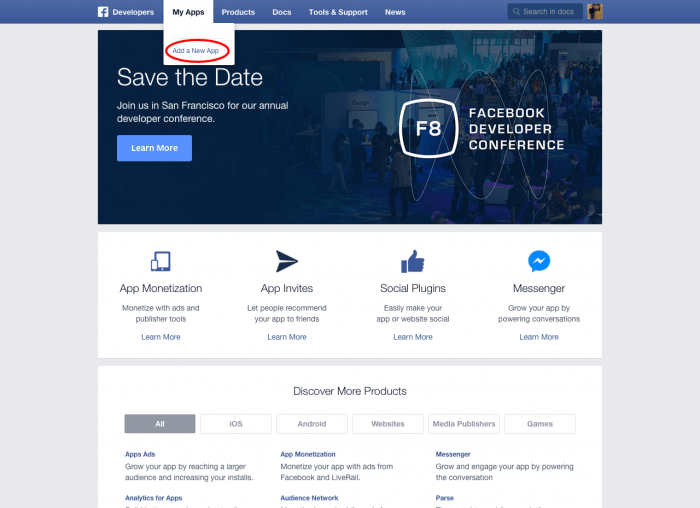
Firstly you need to create a Facebook App, which is required in order to use the API. Sign in to your Facebook Developers account and click the ‘Add a New App’ link as shown below:
Enter your App name and click ‘create’. Under ‘settings’, you’ll need to add a ‘website platform’ and enter the domain where this script will sit. For security, it’s also worth adding the IP address of the server where your site sits in the ‘Server IP Whitelist’ field. You do so under ‘advanced settings’.
2. Install the Facebook PHP SDK:
In this example I’ll assume your code will sit in a ‘facebook’ folder in the root directory of your site. Firstly, create a blank ‘index.php’ file within your ‘facebook’ folder. Next up, you need to include the Facebook SDK for PHP.
Facebook recommend you include the PHP SDK in your project using Composer, but you can also manually do so. In this example we’ll manually include the SDK, so you firstly need to download the SDK.
Unzip the files and put the ‘src’ folder in your ‘facebook’ folder. Then include the SDK in your index.php file:
|
1 2 |
define('FACEBOOK_SDK_V4_SRC_DIR', __DIR__.'/src/Facebook/'); require_once(__DIR__.'/src/Facebook/autoload.php'); |
3. Enter your App’s settings:
Next up, you need to enter your ‘App ID’ and ‘App secret’ keys into the code below. You can get your App’s ‘App ID’ and ‘App secret’ under the ‘dashboard’ tab:
|
1 2 3 4 5 |
$fb = new Facebook\Facebook([ 'app_id' => 'xxxxxxxxxx', 'app_secret' => 'xxxxxxxxxx', 'default_graph_version' => 'v2.2', ]); |
4. Get a non-expiring Access Token for your App:
Next up, if you want to automatically post content to your Facebook page like I needed to…you’re going to need to get a non-expiring Access Token for your page. Firstly, visit the Facebook Graph API Explorer page. You’ll see an ‘Application’ button in the top right as show below:
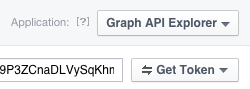
As you can see, currently this is set to ‘Graph API Explorer’. Select your Facebook App instead. Now click the ‘get token’ button which you can also see in the image above. Select ‘Get User Access Token’ and click the ‘extended permissions’ link. Tick the ‘publish_pages’ and ‘manage_pages’ permissions then click the ‘Get Access Token’ button. Now click the ‘get token’ button again and select your Facebook page. You now have your Access Token which we need to convert into the non-expiring Access Token. To do so, pass your App ID, App Secret and Access Token into the following URL:
https://graph.facebook.com/oauth/access_token?grant_type=fb_exchange_token&client_id=appid&client_secret=appsecret&fb_exchange_token=accesstoken
Now copy the token provided.
5. The code that does the ‘posting’:
Next up, the code that actually posts the content to the Facebook page. In my case I wanted to loop through WordPress posts and post a link and comment for any newly added posts onto my clients Facebook page. Within my WordPress posts loop was the all important code below:
|
1 2 3 4 5 6 7 8 9 10 11 12 13 14 15 16 17 |
//Post property to Facebook $linkData = [ 'link' => '<strong>www.yoururl.com</strong>', 'message' => '<strong>Your message here</strong>' ]; $pageAccessToken ='<strong>yournonexpiringtoken</strong>'; try { $response = $fb->post('/me/feed', $linkData, $pageAccessToken); } catch(Facebook\Exceptions\FacebookResponseException $e) { echo 'Graph returned an error: '.$e->getMessage(); exit; } catch(Facebook\Exceptions\FacebookSDKException $e) { echo 'Facebook SDK returned an error: '.$e->getMessage(); exit; } $graphNode = $response->getGraphNode(); |
There you go, if you now run this file it will post your content to your Facebook page.
Note: You will see the post appear on the Facebook page, but no-one else will as you have not set your App ‘live’! To do so, go back to your Facebook Developers account and select your App. Under the ‘Status & Review’ tab tick the checkbox at the top of the page next to the text ‘Do you want to make this app and all its live features available to the general public?’.
6. The automation:
Now all I needed was the automation. To achieve this all I needed to do was set up a cron job that ran the index.php file every x amount of hours…and there was the automation.
taken from here